If you’re like me, you’re using email not just as a way to communicate with people. You’re also using it to make sales and build your business.
If you’re building a business, it’s important to be able to track what’s causing sales.
When you send out a series of emails, are you able to determine which ones are actually responsible for selling stuff? If you have two ideas for a subject line, how do you know which one will perform better?
The answer is by setting up and tracking conversions. Conversions are able to track whatever you tell Drip to track.
But the problem is that most people NEVER set up any conversion tracking. That should end for you after this tutorial.
Conversions in Drip
When looking at your Drip dashboard, if conversions are set up and you’ve had a few, you’ll see a red line in the summary graph. This shows conversions on a daily basis.
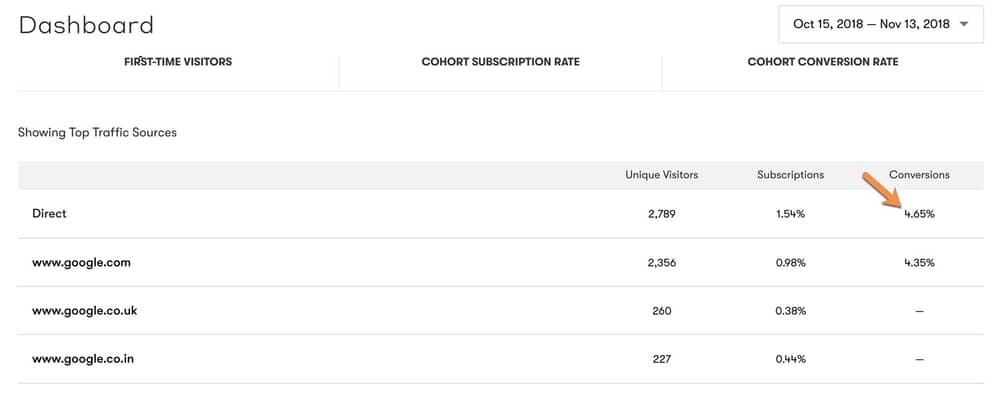
In my case, you will also see that my Cohort conversion rate is 4.8. That means 4.8% of the people who visited my blog for the first time and subscribed to my list ultimately did what I wanted them to do.
For me, that means they joined my Blogger Coaching Club.
That’s my membership community where I teach you how to build a business with a blog. At the bottom of the page, it shows conversions for different traffic sources.
It’s telling me that 4.65% of the people who subscribed to my list after coming directly to the site ended up buying.
However, Drip isn’t going to track conversions automatically, you have to tell it what a conversion means.

How to Setup Conversion Tracking
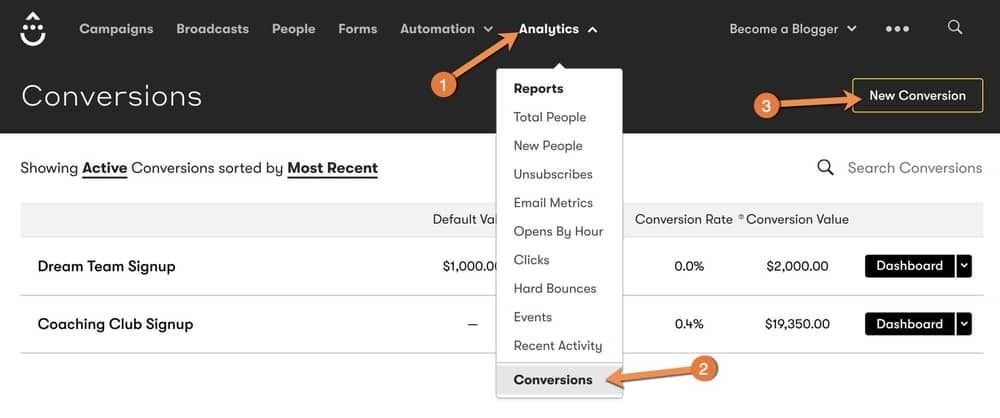
In Drip, click on Analytics, and then select “Conversions”.
This is where you’re able to tell Drip what to Track as a conversion.
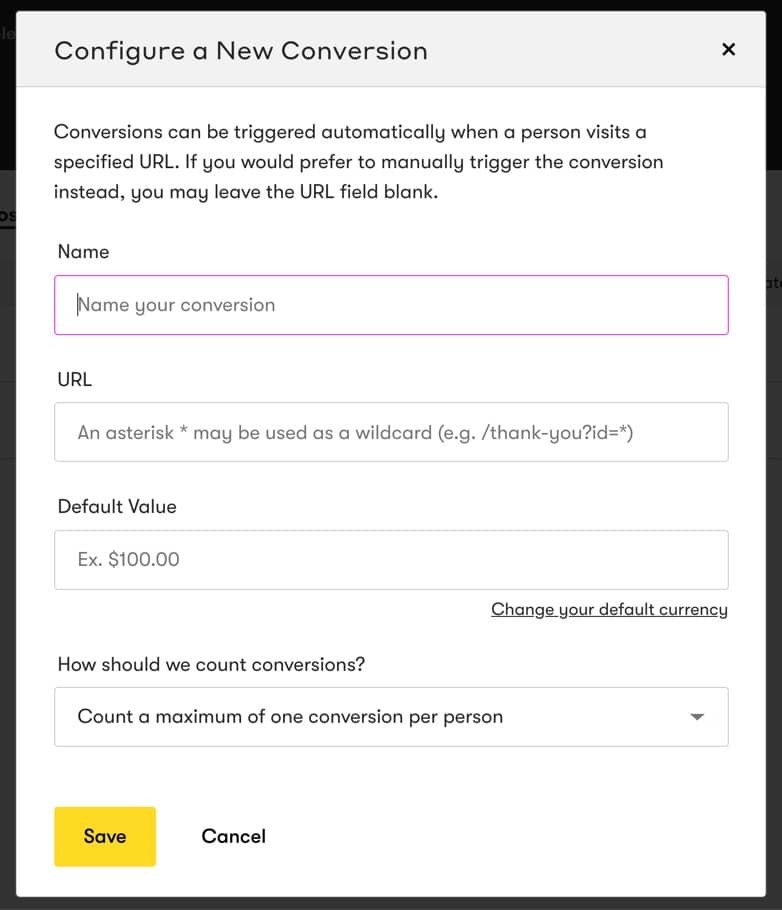
Click on the “New Conversion” button. Then put in the conversion details. By default, it has you set it up as a URL visit.

Now this will only work if you have Drip integrated with your website. Let’s call this conversion “Coaching Club Member”.
This is where you want to specify the URL that should trigger this conversion. You want to enter the payment confirmation page URL here.
Whatever page they land on once the sale is made – that’s the URL you want to enter here.
This isn’t the most accurate way in many cases. In some cases, someone might visit the thank you page multiple times.
If that’s the case for you, you definitely don’t want it to keep saying there’s a conversion whenever they visit that page.
Also, if Drip doesn’t know that they are a subscriber, then the tracking won’t happen the way you want it to happen.
For those reason, I prefer to trigger the conversion manually using a rule or automation. And I’ll show you how to do that in a little while. But for now, let’s continue with this process.

The next thing you can set is a default value. If the conversion is for a sale, you can enter the initial price here.
Then, you can tell Drip whether to count it as a conversion every time this event happens. You can instruct Drip to count a maximum of one conversion per person.
This would counteract the problem I referred to earlier.
I’m gonna leave the URL blank and click on “Save”
Once I do that, you will see that the Conversion shows up in the list.
How to Trigger a Conversion in an Automation
To do this, click on “Automations” and then go to “Rules”
Once there, create a “New Basic Rule”
Give the rule a name. In this case, I’ll call it “Conversion | Coaching Club”.
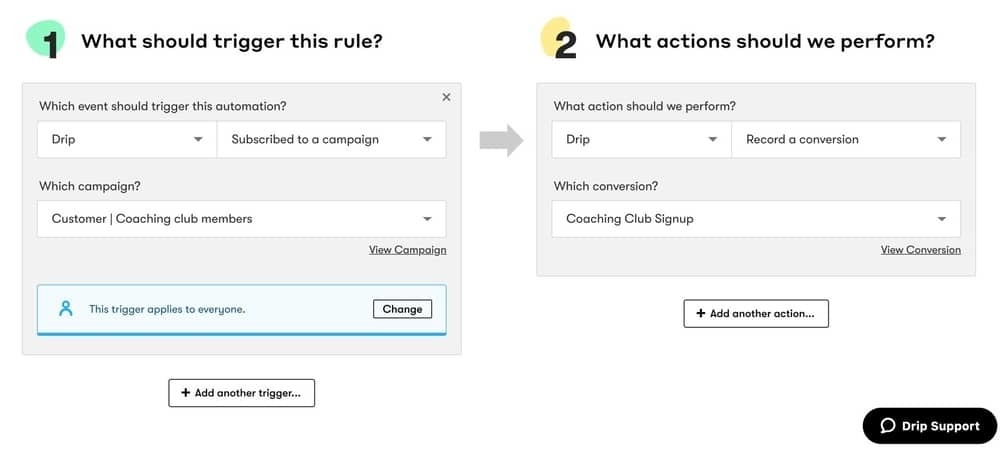
Now in my case, when someone signs up to my coaching club, they are automatically subscribed to my coaching club campaign.

That’s the perfect event to trigger the conversion. So, for the event, I can select “Subscribed to a campaign” and then select “Coaching Club Members”.
The action I’m gonna choose is “Record a Conversion”. And then the Conversion I’ll choose is “Coaching Club Member”. Once I set that up I will click on “Save Rule”
Lastly, I will activate the rule by clicking on “Draft” and selecting “Activate”.
And just like you selected the action here to record a conversion, you can also add an action to any workflow.
QUESTION: What conversion event do you need to track in your business. Go ahead and leave your answer to this question in the comments area below.

